It took me over two years to recognize that I needed a standing desk.
When I started working here at The Verge, one of the first tech toys I got to play with was a desk that you could raise and lower to a standing or sitting position. It was the first time I’d actually tried one, and until then, I had always been a little skeptical about the idea of standing desks. How could you do your work while you’re standing there shifting from foot to foot?
However, I soon lost my skepticism. I found that spending some time on my feet kept me from getting restless and helped keep me alert in the later hours of the afternoon. I not only got used to it but also truly liked having it.
Then, of course, came the pandemic. And I was back in my home office.
At first, at least for me, it wasn’t a big deal. I had spent several years working from the small second bedroom in our house; I could do it again. But slowly, I realized that I had become used to having that standing desk available. I missed it.
I briefly considered purchasing a new desk for the office. But the one that several people at The Verge recommended, the Fully Jarvis Bamboo Standing Desk, usually runs around $600 or so, and I had other expenses to deal with. Also, those desks tend to be rather large, and my office is already overcrowded with shelves, filing cabinets, and a variety of miscellaneous furniture and tech that would take several months to go through. Finally, I like my little wooden desk — it has family history — and I didn’t want to either discard it or condemn it to a lonely storage existence. So I began to see if I could come up with a kludge that would give me what amounted to a standing desk.
Here’s what I’ve tried, what didn’t work, and what eventually did.
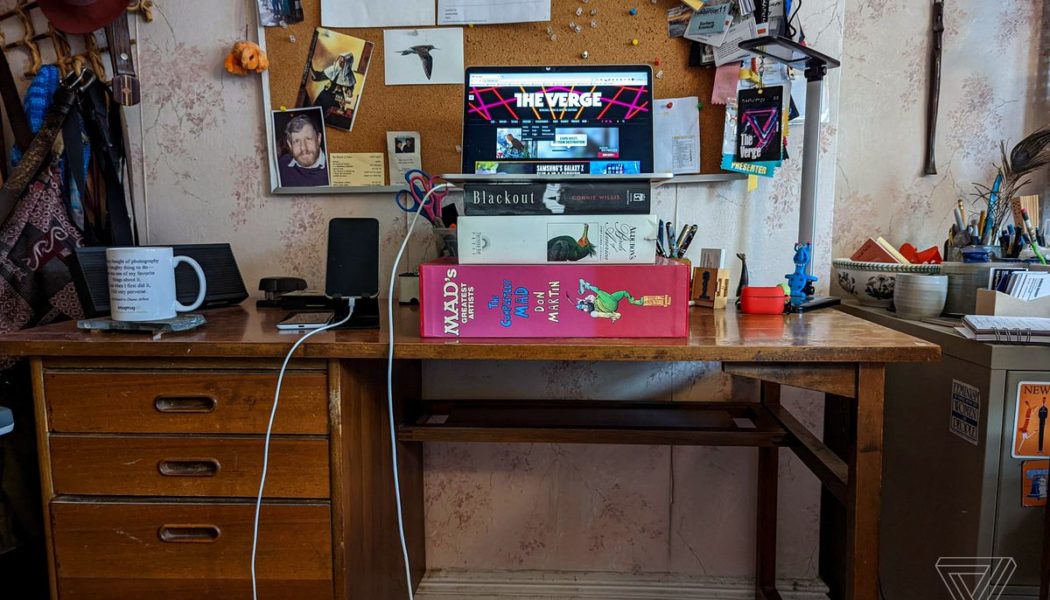
A pile of books
:no_upscale()/cdn.vox-cdn.com/uploads/chorus_asset/file/23947895/bkrasnoff_220810_226136_0003.jpg)
For the most part, I work just using my laptop; it’s not hooked into a larger monitor or a keyboard. My first thought was to simply have available a pile of large books that I could move on or off the desk as I needed them.
I piled up several of my larger books and put my laptop on top of them. At first, I thought I’d resolved the issue; the books were large enough to hold the laptop reasonably steady. But the pile of books was also, well, heavy, and every time I wanted to stand and work, I had to move them — which may have been a good upper body exercise but wasn’t exactly an encouragement to switch from sitting at my desk. And since I have my phone on a stand next to my laptop and do tend to refer to it occasionally, it was an inconvenience to have to stare down from the pile of books to where it sat on my desk.
So the pile of books didn’t work.
A bookcase shelf
:no_upscale()/cdn.vox-cdn.com/uploads/chorus_asset/file/23947897/bkrasnoff_220812_226136_0001.jpg)
One inspiration for creating a do-it-yourself standing desk came from Verge co-worker Kaitlin Hatton, who, back in April of 2020, converted a bookcase into a standing desk. I thought that was a really nice idea, and although I don’t have the nifty Target bookcase that she had used, I do have a rather ugly but very serviceable metal shelving unit that stands near my desk and usually holds a printer, a load of old hard drives, a bag of unused greeting cards, a bunch of out-of-date laptops that I haven’t yet been able to get around to recycling, and a variety of other odds and ends that have accumulated over the years.
So I cleared off a shelf, moved the trash and recycling baskets that were on the floor next to it, and gave it a try as a standing desk.
This was a better experience than my pile of books. There was plenty of space on the shelf for my phone and a notebook and pen (in case I needed to take any notes). It was the perfect height for me to stand and type. And since it was an open bookcase, I could even arrange for a separate cable to plug my notebook in.
However, it was not very convenient to have to move my notebook / phone / other materials back and forth from the shelf to the desk. To really work for me, I would have had to move the entire six-foot-high shelf so that it was next to my desk, and the current setup of my office didn’t really allow for that.
And I had no idea what to do with the things I’d cleared off that shelf to make a workspace. (Although anyone looking at the amount of stuff I’ve accumulated would justifiably wonder if having to get rid of a lot of what was there might not be a good thing.)
So while this was a possibility, it wasn’t an ideal solution. I was going to have to bite the bullet and either buy a new desk or find another alternative.
Standing desk converter
:no_upscale()/cdn.vox-cdn.com/uploads/chorus_asset/file/23947896/bkrasnoff_220810_226136_0004.jpg)
I finally decided to try a standing desk converter. There are a variety of these devices out there; they basically sit on top of your current desk and create an additional work surface that can be raised or lowered.
These devices vary widely, from extremely simple ones that will raise to a single height to surfaces that can be manually moved up and down to your desired height and motorized converters that just need the push of a button.
I weighed my needs, the size of my desk, and my budget; scoured the internet for reviews; and settled on a manual desk converter from a company called Vivo that uses a side handle to move the surface up or down. Like all the converters I found (except the simplest ones), it added about four inches to the height of the desk at its lowest level, but it also had a keyboard tray that would hang to the level of the desk. I didn’t need the keyboard tray (because I currently don’t use a separate keyboard), but the tray was a separate piece that could be added or removed as needed. So I ordered the Vivo.
When it came, the desk converter worked like a charm. Since I wasn’t going to bother with the keyboard tray, I simply attached four rubber feet to the four corners of the converter’s support, cleared my desk, and put it on top. The handle at the top let me smoothly raise the surface to exactly the right height, and while I needed to push down slightly to lower it, it worked exactly as I needed it to. Except for one thing.
I had wondered whether the four extra inches that the converter (at its lowest) added to the height of my desk might make it difficult to use when I was seated. Unfortunately, I was right — I had trouble using my laptop in a seated position. And at a weight of about 20 or so pounds, I wasn’t going to be moving the Vivo on and off the desktop every time I needed it.
I began to wonder whether there was any real answer short of investing in a new desk.
Desk converter plus TV table
Luckily, I found a solution.
I happen to have an old TV table that, for the last couple of years, has been just holding books and an out-of-date, no-longer-used monitor and whose surface is a few inches lower than that of my desk. I removed the monitor, replaced it with the desk converter, and moved the table so it was positioned at a right angle to my desk. (You can see the results in the top photo in this article.)
Success! Now, whenever I want to spend some time standing rather than sitting, I just shift my computer over to the Vivo on the TV table, adjust the height (if I need to), and work away. I want to sit again? Just move my laptop back to the desk. I can even adjust the Vivo so that the laptop camera is a better height for Zoom sessions.
It’s probable that this arrangement could change — I may decide to get a display and keyboard and rearrange the workspace to accommodate them — but for now, I can sit or stand while I work with comfort and confidence.
Photography by Barbara Krasnoff / The Verge